Tech Me More

To quench our thirst of sharing knowledge about our day to day experience & solution to techincal problems we face in our projects.

Advertise with us !
Send us an email at diehardtechy@gmail.com
Showing posts with label TestNG. Show all posts

Tuesday, April 18, 2017

Solution: java.lang.AbstractMethodError: org.testng Error


How to solve 


java.lang.AbstractMethodError: org.testng.remote.RemoteTestNG$DelegatingTestRunnerFactory.newTestRunner(Lorg/testng/ISuite;Lorg/testng/xml/XmlTest;Ljava/util/Collection;)Lorg/testng/TestRunner;
    at org.testng.SuiteRunner$ProxyTestRunnerFactory.newTestRunner(SuiteRunner.java:587)
    at org.testng.SuiteRunner.init(SuiteRunner.java:161)
    at org.testng.SuiteRunner.<init>(SuiteRunner.java:114)
    at org.testng.TestNG.createSuiteRunner(TestNG.java:1290)
    at org.testng.TestNG.createSuiteRunners(TestNG.java:1277)
    at org.testng.TestNG.runSuitesLocally(TestNG.java:1131)
    at org.testng.TestNG.run(TestNG.java:1048)
    at org.testng.remote.RemoteTestNG.run(RemoteTestNG.java:115)
    at org.testng.remote.RemoteTestNG.initAndRun(RemoteTestNG.java:207)
    at org.testng.remote.RemoteTestNG.main(RemoteTestNG.java:178)

error ?

This is one of the common issue people face when running testng suites. 

Most common reason is conflicting of testng versions. May be there are 2 versions of testng in your classpath , which are causing this issue.

Check your maven dependency from Build path

[Right click on project-->Build Path -->Configure build path --> Maven dependency and check for testng]

if there are 2 version of testng, delete one. 

This should solve your problem.

If you get stuck somewhere, contact us here : Email

Saturday, September 3, 2016

How to get Test Case Detail from testlink using TestLink Java API?

Getting test case detail from testlink using API is quite needful when displaying results in Reports.

To get test case related detail you will need testlink-java-api.

Prerequisite:


  1. TestLink-Java-API
  2. Java 1.7 or higher
  3. Maven

Since, TestLink-Java-API depends on mulitple other jars, it ia adviceable to create a Maven project and add the below dependencies in POM.XML


<dependencies>
  <!-- Commons APIs -->
  <dependency>
   <groupId>commons-lang</groupId>
   <artifactId>commons-lang</artifactId>
   <version>2.6</version>
   <type>jar</type>
   <scope>compile</scope>
  </dependency>
  <dependency>
   <groupId>commons-io</groupId>
   <artifactId>commons-io</artifactId>
   <version>2.4</version>
   <type>jar</type>
   <scope>compile</scope>
  </dependency>
  <!-- Logging APIs -->
  <dependency>
   <groupId>org.slf4j</groupId>
   <artifactId>slf4j-simple</artifactId>
   <version>1.7.21</version>
  </dependency>
  <!-- Configuration APIs -->
  <dependency>
   <groupId>commons-configuration</groupId>
   <artifactId>commons-configuration</artifactId>
   <version>1.10</version>
  </dependency>
  <!-- XML-RPC related APIs -->
  <dependency>
   <groupId>org.apache.xmlrpc</groupId>
   <artifactId>xmlrpc-common</artifactId>
   <version>3.1.3</version>
   <type>jar</type>
   <scope>compile</scope>
  </dependency>
  <dependency>
   <groupId>xml-apis</groupId>
   <artifactId>xml-apis</artifactId>
   <version>2.0.2</version>
   <type>jar</type>
   <scope>compile</scope>
  </dependency>
  <dependency>
   <groupId>commons-httpclient</groupId>
   <artifactId>commons-httpclient</artifactId>
   <version>3.1</version>
   <type>jar</type>
   <scope>compile</scope>
  </dependency>
  <dependency>
   <groupId>br.eti.kinoshita</groupId>
   <artifactId>testlink-java-api</artifactId>
   <version>1.9.14-0</version>
  </dependency>
<dependencies>


Use the below code to retrieve Test case description, Steps to execute, Expected results etc. using External test case id.


public void getTestDetailFromTestLink() {
  String testCaseDescription = "", expectedResults = "", steps = "";
  URL url;
  try {
   url = new URL("http://localhost/testlink/lib/api/xmlrpc/v1/xmlrpc.php");

   String devKey = "5062c3fertf9b8886e0edd0ffdf6b14";
   TestLinkAPI api = new TestLinkAPI(url, devKey);
   TestCase tCase = api.getTestCaseByExternalId("P1-46039", 1);

   testCaseDescription = tCase.getSummary();

   List<TestCaseStep> list = tCase.getSteps();
   Iterator<TestCaseStep> itr = list.iterator();
   while (itr.hasNext()) {
    TestCaseStep tcs = itr.next();
    expectedResults = tcs.getExpectedResults();
    steps = tcs.getActions();

   }
  } catch (Exception e) {
   e.printStackTrace();
  }

  System.out.println("Description :"+testCaseDescription);
  System.out.println("Expected Result :"expectedResults);
  System.out.println("Steps to Execute :"+steps);
  
 }


Above code produces the below output.

Description :Verify that on selecting Die Hard Techy from Side menu takes user to blog screen.

Expected Result :User should be navigated to Screen.

Steps to Execute :1.Open DieHardTechy website. 2.Select Die Hard Techy.

Monday, February 8, 2016

How to run two different application on two physical android devices in parallel?

Parallel execution of android applications have become a need now days given that number of test scenarios are higher. 

Parallel execution is done to achieve maximum test coverage with minimal time.

Appium provides a way for parallel execution.

To achieve this , we have to do the following steps.
  1. We need to start 2 appium instances on different ports.
  2. Boot strap port numbers for both the instances must be different.
  3. provide the unique identifier of physical devices using -U flag.
  4. If you are trying to run an Hybdrid application in parallel, make sure you start chrome driver on 2 different ports.


You can skip the point 4 if you are automating native android apps.

To start appium server you must have node.js installed or you can use default node executable residing inside appium installation directory.

1. Open a command prompt in admin mode and navigate till main.js file inside appium installation directory.

Main.js is find here: 

C:\Program Files (x86)\Appium\node_modules\appium\lib\server

2. run the below commands in different command prompt window. 

node main -p 4725 -bp 2293 -U place device 1 UDID--chromedriver-port 6000

node main -p 4724 -bp 2292 -U place device 2 UDID--chromedriver-port 6001

You will see appium server up and running on 2 different ports.


Instance 1

Instance 2


3. Now go to your testng.xml file and pass port number and device name as parameter from your testng.xml suite file.

Please make sure parallel attribute inside <suite> must be set to tests.


<!DOCTYPE suite SYSTEM "http://testng.org/testng-1.0.dtd">
<suite name="Preserve order test runs" parallel="tests">
   <test name="Test for account settings Mobile" preserve-order="true" >
        <parameter name="appName" value="accounts_582.apk" />
        <parameter name="deviceName" value="HTC Nexus 9" />   
        <parameter name="paramName" value="4724" />     
        <classes>
          <class name="omniauto.tests.Accounts_AndroidTest"></class> 
              <class name="omniauto.tests.AggregatedAccount_Settings"></class> 
              <class name="omniauto.tests.ManualAccountSettings_Test"></class> 
        </classes>
    </test>
    <test name="Test suite for account group setting Mobile" preserve-order="true" >
        <parameter name="appName" value="accountgroupsettings_582.apk" />
        <parameter name="deviceName" value="Samsung I9500 Galaxy S4" />
        <parameter name="paramName" value="4725" />
        <classes>
            <class name="omniauto.tests.Account_Group_Settings"></class>
        </classes>
    </test>
    
</suite>


4. Use that port number in forming your driver instance. 

driver = new AppiumDriver(new URL("http://127.0.0.1:"+portNum+"/wd/hub"), capabilities);

Happy learning ! :)

Friday, December 4, 2015

How to get rid of irritating SocketExceptions in TestNG?

While running your TestNG classes you may encounter some Exception like

java.net.SocketException: Software caused connection abort: socket write error

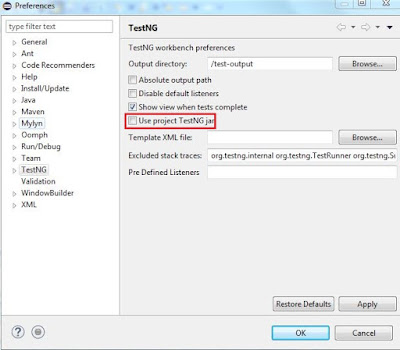
to avoid the SocketException in Eclipse please do the following changes.


  • Go to Windows from Menu Bar in Eclipse.
  • Select Preferences.
  • It will open a new window.
  • Choose TestNg and uncheck Use Project TestNG Jar.
  • Click apply and click OK.